
DS1302 RTC IC 简介
DS1302 是一款经济高效的计时应用解决方案。它以实惠的价格提供计时功能,适合业余爱好者、创客和成本敏感的项目。DS1302 准确记录时间,包括小时、分钟、秒、日期、月份和年份。它有一个内置时钟电路,在外部 32.768 kHz 晶体振荡器上运行。DS1302 有一个内置涓流充电器和一个由外部备用电池供电的小型 RAM 区域。这使得 RTC 即使在主电源断开时也能继续计时。DS1302 使用简单的串行接口与微控制器或主机系统通信。它支持双向数据线、时钟线和片选线进行数据传输。
通过使用 SSC(同步串行通信)简化了 DS1302 与 MCU 的连接。只需三根线即可与 DS1302 时钟随机存取存储器或 RAM 进行通信。所需的线路为 RST(芯片使能)、DAT(输入输出数据线)和 CLK(串行时钟)。
RTC 有什么作用?
RTC(即实时时钟)是一种 IC 芯片或模块,旨在跟踪时间和日期。它用于各种电子设备,例如计算机、微控制器、嵌入式系统以及其他需要精确计时的设备。
RTC 的主要目的是为其集成的设备提供可靠的时间和日期参考。它包含一个时钟电路和一个小型备用电源(通常是电池),即使在主电源断开时也可以继续运行。这确保了即使在断电或设备关闭时,时钟也能继续准确地计时。
接下来,我将一步步教你如何使用 DS1302 实现时间实时显示:
材料准备
- Arduino UNO板
- DS1302 实时时钟模块
- 杜邦线
硬件连接
时钟模块的 VCC 引脚接 Arduino 的 5V 引脚。
时钟模块的 GND 引脚接 Arduino 的 GND 引脚。
时钟模块的 CLK 引脚接 Arduino 的 D5 引脚。
时钟模块的 DAT 引脚接 Arduino 的 D4 引脚。
时钟模块的 RST 引脚接 Arduino 的 D2 引脚。
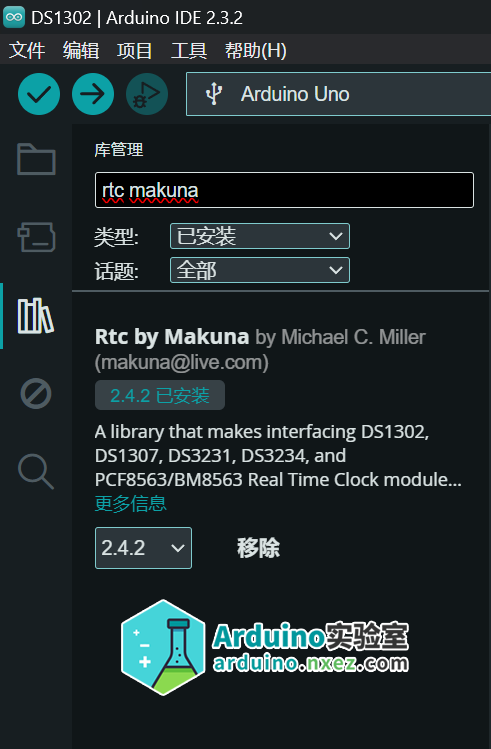
实时时钟库安装
我们推荐 Makuna 的 RTC 库,以便轻松连接 DS1302、DS1307、DS3231 和 DS3234 实时时钟模块。该库包含对模块功能的深度支持,包括温度、警报和内存存储(如果存在)。
在 IDE 中点击「工具」—「管理库」,查找「RTC Makuna」进行安装。
编写代码
以下代码是用于与 DS1302 RTC 模块进行通信的 Arduino 代码。它使用了 ThreeWire库和 RtcDS1302 库来实现与RTC模块的通信。
以下是代码的主要部分:
#include <ThreeWire.h>
#include <RtcDS1302.h>

ThreeWire myWire(4,5,2);
RtcDS1302<ThreeWire> Rtc(myWire);

void setup ()
{
  // 初始化串口通信
    Serial.begin(9600);

   // 打印编译时间
    Serial.print("compiled: ");
    Serial.print(__DATE__);
    Serial.println(__TIME__);

   // 初始化RTC模块
    Rtc.Begin();

  // 获取编译时间并打印
    RtcDateTime compiled = RtcDateTime(__DATE__, __TIME__);
    printDateTime(compiled);
    Serial.println();

  // 检查RTC模块是否有效,如果无效则设置为编译时间
    if (!Rtc.IsDateTimeValid())
    {
        Serial.println("RTC lost confidence in the DateTime!");
        Rtc.SetDateTime(compiled);
    }
     // 检查RTC模块是否写保护,如果是则取消写保护
    if (Rtc.GetIsWriteProtected())
    {
        Serial.println("RTC was write protected, enabling writing now");
        Rtc.SetIsWriteProtected(false);
    }
  // 检查RTC模块是否在运行,如果没有则启动
    if (!Rtc.GetIsRunning())
    {
        Serial.println("RTC was not actively running, starting now");
        Rtc.SetIsRunning(true);
    }
  // 获取当前时间并与编译时间进行比较,如果RTC时间早于编译时间,则设置为编译时间
    RtcDateTime now = Rtc.GetDateTime();
    if (now < compiled)
    {
        Serial.println("RTC is older than compile time!  (Updating DateTime)");
        Rtc.SetDateTime(compiled);
    }
    else if (now > compiled)
    {
        Serial.println("RTC is newer than compile time. (this is expected)");
    }
    else if (now == compiled)
    {
        Serial.println("RTC is the same as compile time! (not expected but all is fine)");
    }
}

void loop ()
{

  // 获取当前时间并打印
    RtcDateTime now = Rtc.GetDateTime();

    printDateTime(now);
    Serial.println();

    // 检查RTC时间是否有效,如果无效则打印错误信息
    if (!now.IsValid())
    {
        // Common Causes:
        //    1) the battery on the device is low or even missing and the power line was disconnected
        Serial.println("RTC lost confidence in the DateTime!");
    }

    delay(5000); // 延迟5秒
}

#define countof(a) (sizeof(a) / sizeof(a[0]))

// 格式化打印日期时间
void printDateTime(const RtcDateTime& dt)
{
    char datestring[20];

    snprintf_P(datestring,
            countof(datestring),
            PSTR("%02u/%02u/%04u %02u:%02u:%02u"),
            dt.Month(),
            dt.Day(),
            dt.Year(),
            dt.Hour(),
            dt.Minute(),
            dt.Second() );
    Serial.print(datestring);
}
主要代码说明
代码的主要功能是初始化 RTC 模块并与 Arduino 进行通信,获取当前时间并打印在串口监视器上。以下是代码的主要步骤:
1、引入所需的库文件:ThreeWire.h 和 RtcDS1302.h。
2、创建 ThreeWire 对象和 RtcDS1302 对象,用于与 RTC 模块进行通信。
3、在 setup 函数中进行初始化:
初始化串口通信。
打印编译时间。
初始化 RTC 模块。
获取编译时间并打印。
检查RTC模块是否有效,如果无效则设置为编译时间。
检查RTC模块是否写保护,如果是则取消写保护。
检查RTC模块是否在运行,如果没有则启动。
获取当前时间并与编译时间进行比较,如果RTC时间早于编译时间,则设置为编译时间。
4、在 loop 函数中:
获取当前时间并打印。
检查 RTC 时间是否有效,如果无效则打印错误信息。
延迟5秒。
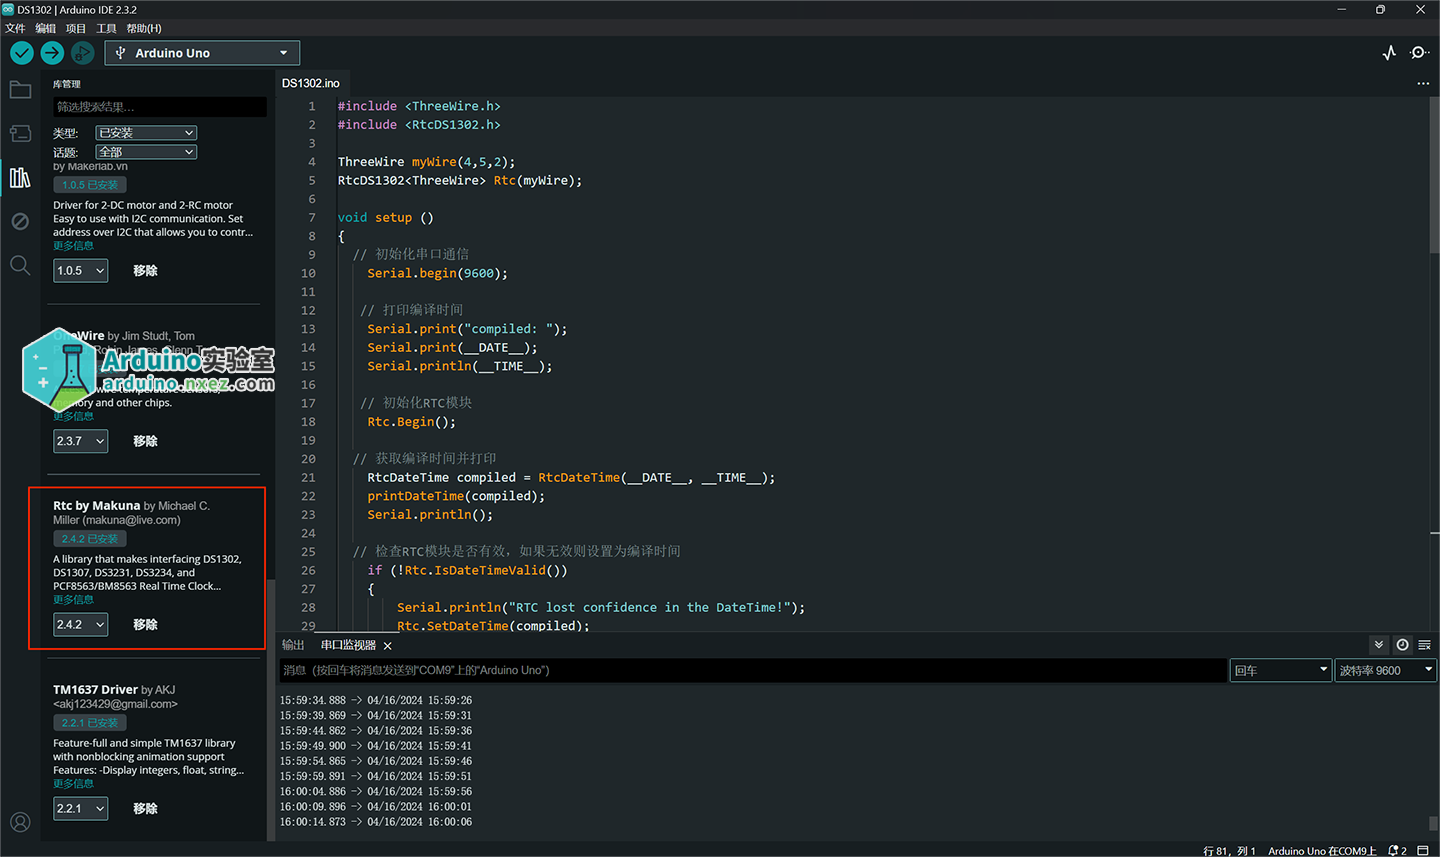
下图是代码的运行结果:
你还可以:
查看系列教程中的其他文章
购买本教程所用到的 Pico 套件


发表评论
要发表评论,您必须先登录。